Windowframe Patterns
Use Your Electronic Craftcutter to Make Your Own Putz House Windowframes
As of March, 2021, the most recent time Cricut reworked their software, this project will work with:
- Modern Cricuts with 12” carrages (currently Maker and Explores)
- Silhouettes with 12” carriages (currently Portrait and all working Cameos). (Though you need the either the Silhouette “Design” upgrade or Sure-Cuts-A-Lot to import SVG files
- Nearly every other craftcutter or vinyl signcutter that uses software that imports .svg files. This includes first-gen Cricut Expression if you have it working with Sure-Cuts-A-Lot. Don’t rush out and buy an old Expression and THEN try to get it working with SCAL software, but if you have one, this article may help you get it working with .svg files.
I’ll be honest, if you’re planning ahead, you can get the most authentic replacement windows as well as high-quality diecut putz house windowframes from collector Pete Oehmen. But if you already have a craftcutter and you want to try your hand at making your own windows “from scratch,” or if for some reason ordering is impractical for you, we have files you can experiment with, as well as a few successes to report:
I have a craftcutter that uses a “gummy” cutting mat to hold the media the way Cricut does. It also has a similar blade setup, in which the lowest setting (#1) barely cuts a sheet of paper, and so on. I’ve used it for a number of craft projects, but I couldn’t help wondering if I could use it to make putz house windowframes. 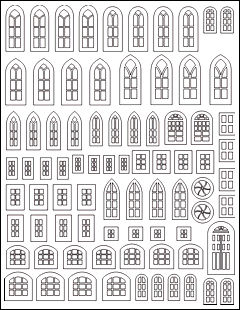
One of my concerns was that the windowpane openings on the smallest windows are so tiny that I’d be demanding a ridiculous amount of precision out of a household device. Still, the graphics software I used to design our “cello sheets” will export .svg files, and the software I use to drive my cutter will import those files, so I figure, what could it cost to experiment?
The first experiment involved taking the outline from a cello sheet directly into an .svg file. (If you’ve printed any of our cello sheets you will recognize the outlines.) If you right-click on the graphic to the right, you should be able to download the .svg version to your hard drive.)
To drive my cutter I used Sure-Cuts-A-Lot2 (shown below).
Note: For a time, only Sure-Cuts-A-Lot 2 would operate the old Expressions this way, and that approach required some hacking and bootlegging. Today, the much-improved Sure-Cuts-A-Lot 5 will also operate early Expressions, Personal Cutters, Creates, Cakes, and Cake Minis, though it requires a third-party add-on described here.
 If you’re new to all this, you should not only read the manuals for your cutter and your software, you should also notice that some software tends to show the cutting mat 90 “sideways” compared to the way you would expect it to go. If you’re new to all this, you should not only read the manuals for your cutter and your software, you should also notice that some software tends to show the cutting mat 90 “sideways” compared to the way you would expect it to go.
When I import an image like the windowframe image above, I may have to rotate it 90 degrees left within the software.
The dotted line within the white area on the virtual screen represents the area within which the craftcutter can actually cut. So when you align your pattern within the cutter, be sure that none of your cuts are outside that line.
 If you want to try one of my SVG files, please do not resize the graphic. If you accidentally do, then close your file without saving it and try again. If you want to try one of my SVG files, please do not resize the graphic. If you accidentally do, then close your file without saving it and try again.
For my first experiment, I used a brand new Cricut-brand cutting mat and gold “vellum” that I got at Jo-Anne’s. (This media was #10709033U from The Paper Company, Lincoln Park, NJ. I’ve seen it at other craft stores, but haven’t been able to find an online source for you.)
My pattern required hundreds of individual “cuts,” so the cutter took nearly a half hour to cut the whole sheet. The photo to the right shows the vellum once the cutter was done with it. (Click on it to see a bigger photo.)
As you can see from the photo below, each window and each windowpane came off the mat one at a time.
I started at the corner, pulling off the scrap “between” part, which left the windowframes and panes on the mat. Then I started with a bottom corner of each windowframe and peeled it slowly off the mat, which generally left the panes in place. This was excruciatingly slow, since I had to be sensitive to any tendancy of the mullions to stick hard enough to tear. Usually this happened because the pane wasn’t completely cut away from the frame and the thin little mullions couldn’t decide whether to come away from the mat with the rest of the frame 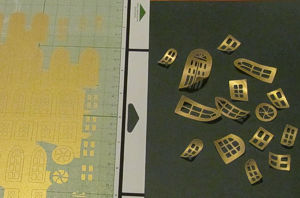 or to stick to the mat with the pane. or to stick to the mat with the pane.
Going slowly helped, not only because it helped me notice when there was a potential snag, but also because the mat’s sticky stuff would release better with light, sustained tension than with a quick pull. Every time I tried speeding up, I started tearing the windowframes. After a tear started I would work my way around and come at it from a different angle. In such cases, I often got the whole frame, even though it was slightly torn. By the time those frames are glued to mylar or whatever, you’ll ne ver notice the tear. ver notice the tear.
I started out using my fingernails to pry up the first corner, but after about an hour resorted to the Cricut spatula tool, which worked fairly well once I figured out the best way to use it with this media.
By the end, I had torn about a dozen windows too badly to use, but I got over sixty good ones, so that was a pretty positive outcome overall.
By the way, pulling the windowframes off of the mat caused them to curl, but I’m sure they’ll be fine once they are glued down.
After the labor of coaxing eighty windowframes off of the mat one at a time, I had to face the issue of 400+ tiny windowpanes that were still on the mat. There was a lot of scraping. Plus the little rectangles (or as they’re sometimes called, “chads”) tended to pop off the mat in odd directions. By the time I was done, the floor looked like a Dade county elections office.
Overall I’d say it took about ten minutes to prep the software and cutter, twenty-five minutes of doing something else while the cutter was busy, maybe two hours to peel all of the windows off of the page, and another twenty minutes getting all of the chads off the mat. Hopefully you can see why this sort of endeavor is better as a craft project than as a commercial enterprise.
For one thing, peeling off windows and scraping off chads is something you can do while you’re watching a Jane Austen movie adaptation or something else that you can follow without keeping your eyes on the screen.
Creating the Peel-Off-Page Version
Cutting all of the frames individually worked, no question. But it meant pulling them off of the mat individually. It also meant that when anyone wants to sort through the 60+ survivors to find, say, four matching windowframes, they’ll have to really sort. So it occurred to me to make a version which you should be able to peel all of the windowframes off at once and cut them apart at your leisure.
 I went back to my original graphic and redrew each frame to remove the straight lines, replacing them with little “notches” at the corners. This way, I could peel them all off at once, and if I wanted four of the same size, I’d simply cut those four out of the page and follow the little notches to cut them out individually. The drawing to the left shows a detail of the resulting page. I went back to my original graphic and redrew each frame to remove the straight lines, replacing them with little “notches” at the corners. This way, I could peel them all off at once, and if I wanted four of the same size, I’d simply cut those four out of the page and follow the little notches to cut them out individually. The drawing to the left shows a detail of the resulting page.
In addition, I added about 1/32” to the width of every mullion, even on the tiniest windows. I was thinking that a window that was slighty too “heavy” but intact overrules a window that is accurate but torn. 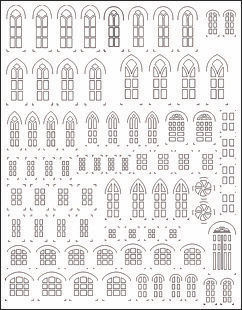
To get the .svg version of the peel-off-page version, click on the drawing to the right. As you can see the top of the arches has an inverted U or V shape. For that reason, when you peel this pattern off, you need to peel from one of the lower corners. If you start from the top, the inverted U or V will tend to stick to the mat, and you’ll rip those windowframes in two
Between cutting the first sheet and the second sheet, I cut some specialized cardstock for another project. That project came out well, but it made a mess of my cutting mat and - as I realized later - wore out my cutting blade. On this pass, the blade mangled several of the vellum windowframes instead of cutting them out. Still, as I had hoped, the whole sheet came off at once, bringing most of the “chads” with it, so cleanup was a lot less. I’d estimate I got under 60 good windows out of that batch, but it took far less time to clean up than the individual windows did.
I replaced the blade, tried to clean the mat up a little, and tried again. I also tried the second level (#2) of depth on the blade. This time it went better. True, the blade still inexplicably magled a few of the windows. Plus, one corner of the media failed to stick, so four of the low arched windows came out funny. But the overall effect was very good. I’d guess maybe 70 good windows, including a few styles that had a relatively high failure rate before. so four of the low arched windows came out funny. But the overall effect was very good. I’d guess maybe 70 good windows, including a few styles that had a relatively high failure rate before.
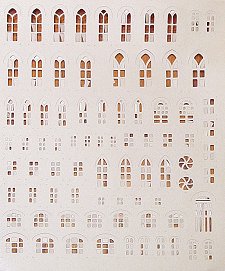
On the photo to the left, I’ve heightened the contrast to make it easier to see the cuts. If you click on it to see the big version, you’ll even see the little notches.
Subsequently, I tried with a brand new mat, but the cutter still mangled a few windows. I went back to the first blade depth (which had worked when I cut out the individual windows). None of the windows were mangled, but most of the chads weren’t cut out very well, so the peeling process was just as time-consuming as when I had cut the individual windows.
Using a Sure Cuts-A-Lot feature, I tried making multiple cuts (4) at the first blade depth to see if that would cut through though all of the chads without mangling windows. Then I tried peeling up one corner while the mat was still in the machine. But after four passes, the chads were still not cut out completely. So I set the blade to the second depth and went one more time. This time I got the best pass of all - all but one window came off intact, and the one that tore was still usable. Of course my cutter was busy for about two and a half hours, plus most of the chads stayed on the mat this time, so there was another long cleanup time . .
When I was at Hobby Lobby, I had also looked at a sheet of shiny gold paper, product # HOTP-20189 from Paper Pizazz. This is a deeper gold color and a stiffer stock with a very plastic feel. I thought it might work. But the ones at “Hob-Lob” were all creased. When I went back to Jo-Anne’s later to pick up one more sheet of vellum, I found the same product. So I got two sheets. I set the first one to make two passes at the second depth. But I paused it after the first pass (another Sure Cuts-A-Lot feature). It seemed like the chads were pretty well ready to come off, so I canceled the second pass. When I peeled it off the mat, nearly every chad came with it, reducing the mat cleanup to a minute or two.
Holding the completed sheet up to the light, I could tell that each chad was barely holding on, so removing them a window at a time would be relatively easy. Compared to the vellum, this is darker, the white edges might show a bit, and the heavier stock will look slightly less authentic. But it was far easier to use.
 A friend had mentioned silver windowframes. At my next visit to Hob-Lob, I looked for silver media but the closest thing I could come up with was “Tin Star Metallic,” # 463323, from The Paper Studio. I also picked up some Antique Gold Metallic, # 390021 from the same company. It’s not as stiff as the Paper Pizazz material, but it’s much cheaper, and also gives an excellent success rate. With a single pass at depth #2, it gave me no mangled windows. It also left most of the chads on the mat, which means more cleanup than the Paper Pizazz version, but an easier time when it comes time to build your putz house. On the whole, this might become my preferred media. A friend had mentioned silver windowframes. At my next visit to Hob-Lob, I looked for silver media but the closest thing I could come up with was “Tin Star Metallic,” # 463323, from The Paper Studio. I also picked up some Antique Gold Metallic, # 390021 from the same company. It’s not as stiff as the Paper Pizazz material, but it’s much cheaper, and also gives an excellent success rate. With a single pass at depth #2, it gave me no mangled windows. It also left most of the chads on the mat, which means more cleanup than the Paper Pizazz version, but an easier time when it comes time to build your putz house. On the whole, this might become my preferred media.
Precision Question Revisited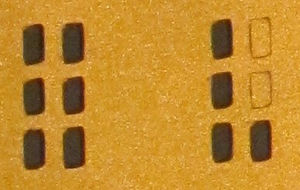
You may recall that I questioned whether a household device would have the precision to cut the tiniest windowframes. Ironically, I usually had a higher success rate with the little windows than with the big ones.
I have to admit that the littlest window openings didn’t come out quite square, as the photo to the right shows. On the other hand, these “panes” are about 1/16” wide - so I dare you to do any better by any other method (besides ordering from Pete, whose tiny diecut windowframe are more precise).
Fat-Mullioned Single-Window Version
In case you would like to try the individual-window version, I have created one more version of that pattern. It retains the individual frames but has the thicker mullions I used in the “whole sheet” version. If you click on the graphic below, you’ll be able to save that version.
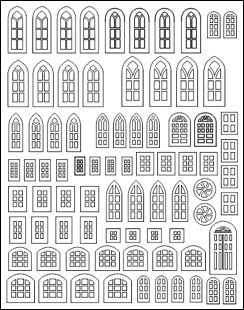 Why Can’t I Open the SVG Files? Why Can’t I Open the SVG Files?
If you’re using a modern Cricut, or Sure-Cuts-A-Lot or most other cutters and combinations, you don’t need to. Simply save the graphic to your hard drive, then open the software you use with your craftcutter or signcutter Then use the import function of that software to pull the .svg file into the program. Don’t resize it. Rotate it if necessary, and move it down to the corner of the “virtual mat” where you’ll be putting your medium on the real mat.
Note: The free version of Silhouette Studio does not import .svg files. If you like Silhouette Studio otherwise, spring for the “upgrade” to the “Design” edition. Otherwise, Sure-Cuts-A-Lot 5 imports .svg files well and will drive your Silhouette directly.
(Remember, Sure Cuts-A-Lot and some other programs show the mat rotated 90 degrees). Then start your cut.
Doing the Math
By the way, I hope you’re not thinking that this will save you money unless you already have a cutter you can use with third-party software (and not just cartridges). Figure $250-400 for the cutter plus $65 to $100 for software, plus a dollar or so for media, plus replacing the mats and blades every so often. If I had bought a craftcutter just to do this project, I would have to say that my first set of windows cost me about $275 and that’s only because I got my cutter on closeout. Pointing out that my second set of windows only cost me about a dollar still won’t make the case for buying a craftcutter just for this project.
That said, I had a long list of projects in mind when I bought my craftcutter, and this wasn’t even one of them. So for me, the ability to use it to make my own windowframes is just an added bonus. I hope you will see it that way as well.
We have also added these to our Resources section under the Free SVG Files page, where we hope to add other downloadable SVG resources eventually..
Do These Really Work?
Here’s an “early return” on this project article: a new putz house by artisan Howard Lamey, who used the silver (“Tin Star”) version to make a house with silver-on-blue windows, which were not commercially available when I wrote this article:
 To see a larger version of the photo, please click on either photo. To see a short history of this project, as well as some suggestions for using vellum-framed windows, please visit this forum. To see a larger version of the photo, please click on either photo. To see a short history of this project, as well as some suggestions for using vellum-framed windows, please visit this forum.
Conclusion
You’ll notice that I am leaving this article “open-ended,” which is to say that I will not be finishing up with specifics like “which cutter to buy,” “which software to buy,” “which media to buy,” or even “which pattern to use.” The truth is that my experience is too limited to recommend one product over another. I can verify that this project does work. But the best solution for you depends on your budget, your skill set, your personal preferences, and any purchases you’ve already made.
Now that I’ve laid the groundwork and made these graphics available, I will be very interested in hearing from anyone who follows up on our experiments.
About Copyright and Reuse of Our Patterns
Some folks who download our SVG patterns are confused by the fact that we left the copyright notice off of the pattern. But that’s because that would drive most craftcutters crazy. The patterns are still copyrighted.
As always, you are allowed to download and use our windowframe patterns for your putz building projects, even for building putzes you plan to sell. You are NOT allowed to use our patterns to make windowframes that you turn around and sell, either by themselves, or in kits.
And for the rest of the putzing community: when you start seeing our windowframes showing up on Etsy or Ebay or whatever - in spite of the previous paragraph, just remember to support the folks who supported you first. :-)
Have a great season, all, and keep in touch.
Paul Race

|