“Coconut”: Drying
This article is a supplement to our “Secret of Coconut” article, which describes various ways modern hobbyists have attempted to reproduce a certain kind of fuzzy-looking coating on vintage cardboard Christmas “putz” houses.
Note: These articles are based on notes from a number of putz house builders and restorers who’ve attempted to replicate the original finish to use on their own construction. We’re publishing them because the questions keep coming in. But we did want to point out that none of the people who contributed to the article (including me) have any intention whatsoever to make this stuff to sell commercially - there are a lot of easier ways to make a living, and there’s already a fellow - Pete Oehman, who makes a better product than I ever will. We’ve done our best to give you the information you need to “roll your own,” but if you’d rather finish that structure than learn a new skill, or if you need to match a difficult color, contact Pete through CardboardPutzHouses.com and tell him we sent you.
Most folks today are experimenting with straw that is rough cut, then chopped to size in some sort of blender or food processor or other kitchen device.
Once your straw or similar material has been dyed or bleached, you need to let it press as much moisture as you can out of it and let dry thoroughly before you attempt to use it.
Moisture Press
Your coconut will dry much faster if you can squeeze as moisture as possible out of it first. The method doesn’t have to be elaborate. I suppose you could stack paper towels above and beneath a batch, set a board on it and stand on it. Or you could use a “cookie press.”
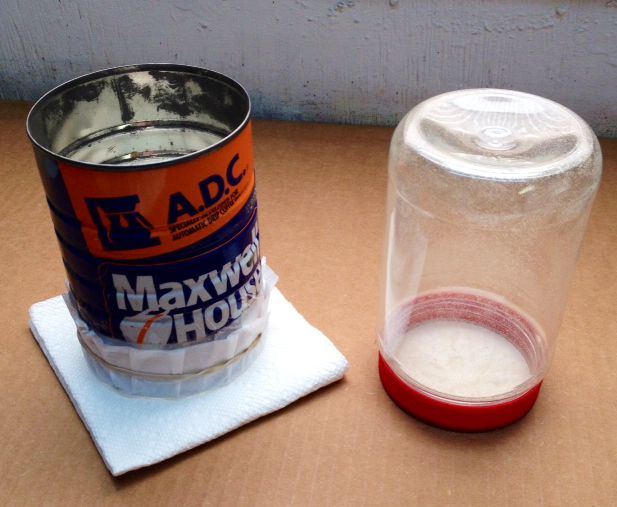
 Or you could do what one reader did and make a simple press by find a used peanut butter jar that just fits inside a sued coffee can. He cut out the other end of the can, rubber-banded a clean coffee filter on the end, put the whole thing on a stack of paper towels, dumped in his newly-dyed (or bleached) coconut, and used the peanut butter jar (upside down) as a piston to force out excess water. I’ve been told that a piece of nylon hose works as well as a coffee filter. Or you could do what one reader did and make a simple press by find a used peanut butter jar that just fits inside a sued coffee can. He cut out the other end of the can, rubber-banded a clean coffee filter on the end, put the whole thing on a stack of paper towels, dumped in his newly-dyed (or bleached) coconut, and used the peanut butter jar (upside down) as a piston to force out excess water. I’ve been told that a piece of nylon hose works as well as a coffee filter.
Drying Pass
If you’re not in a hurry, you can spread it out on wax paper or something similar and wait a week.
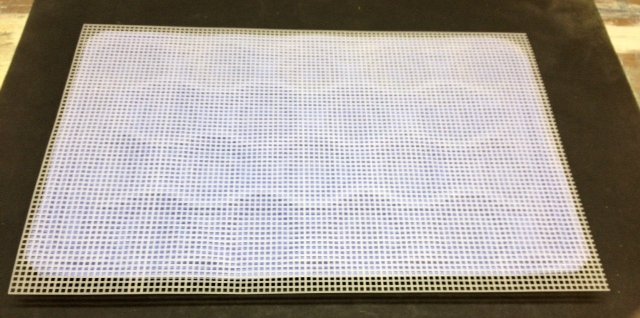
One contributor made a useful “drying rack” from a piece of plastic canvas and one of those fruit trays things they ship expensive apples or pears on. 
 A few folks have reported excellent luck with kitchen dehydrators. Turns out that, a number of homes have these sitting around gathering dust because, in spite of the best of intention, no one ever actually has time to chop up tomatoes or whatever to dry. One reader has gotten his white (bleached) coconut to stay “snow white” while drying it in the dehydrator at the lowest setting. He cautions against putting more than one color in the dehydrator at a time, though - the little bit of air that circulates could cause the colors to get mixed up. A few folks have reported excellent luck with kitchen dehydrators. Turns out that, a number of homes have these sitting around gathering dust because, in spite of the best of intention, no one ever actually has time to chop up tomatoes or whatever to dry. One reader has gotten his white (bleached) coconut to stay “snow white” while drying it in the dehydrator at the lowest setting. He cautions against putting more than one color in the dehydrator at a time, though - the little bit of air that circulates could cause the colors to get mixed up.
The photo to the right shows our contributor’s white coconut in a dehydrator that a family member bought and never used. He says it’s cut the average drying time from days to hours.
If you don’t have a dehydrator, but you have access to nylon screen material or the like, spreading that over any kind of grate that will let air circulate will be a big help.
One reader has used his microwave to speed up the drying of colored coconut. He says you have to do it in short intervals and let it cool off between. Don’t try this on white or very light colors, it will darken your material. Having beautiful snow-white coconut turn tan is heartbreaking.
The same thing goes for putting it on a cookie sheet, setting the oven to 100 degrees and leaving the door open a little. Works for colors, don’t assume that your white is safe.
Conclusion
You may find an entirely different method that works for you. Many hobbyists have. These pages are just to give you some ideas for things to try.
If you’re looking for one good proven method that will work for everybody, this may not be what you were looking for. But so far there’s not single “best practice” that works for everybody, regardless of their skills, interests, and resources.
In other words “Do try this at home.” And when you do, feel free to report your results on the Coconut page of our forums.
In the meantime, I look forward to hearing and seeing the results of your experiments, with this or any other aspects of putz collecting, displaying, restoring, or creating.
Paul Race
CardboardChristmas.com


|