https://cardboardchristmas.com/forums/

Tunnel/Tree-Stand Project
https://cardboardchristmas.com/forums/viewtopic.php?f=10&t=2285
Page 1 of 2

Author:  healey36 [ Wed Feb 21, 2024 4:00 pm ]
Post subject:  Tunnel/Tree-Stand Project

Howard had suggested I post a few additional photos of the village tree-stand I built a year or so ago; I don't have many pics of the completed project, and since I've subsequently trashed it, I've no opportunity to take more. I did, however, take a few in-process during construction, and I post those here along with a blow-by-blow recap.

A few years back, you might remember Howard built his Castle With Train Tunnel project (https://www.cardboardchristmas.com/forums/viewtopic.php?f=10&t=1386), loosely based on the Elastolin toy castles from early postwar period. I was a huge knights-and-castle nut when I was a kid, and his terrific project inspired me greatly, to the point that I actually went ahead and built a version back in the winter of 2020/2021:

Image

It didn't turn out quite as nice as Howard's from a design perspective, and there are any number of things I wish I'd done a bit differently, but it was decent enough and it was great fun to build. It wasn't too long after, perhaps just a few months, I began thinking of a somewhat different application for some of the same construction/finishing techniques. What if you could build a tunnel structure that could also serve as a tree-stand for a four-foot artificial Christmas tree? It seemed do-able, and would go a long way toward a more seamless incorporation of a tree into a putz-style village. With some judicious pointers from Howard, I figured I'd give it a shot.

What follows is a serial description of the Tunnel/Tree-Stand project from the depths of the pandemic, winter of 2021/2022.

Author:  Lynn [ Wed Feb 21, 2024 4:56 pm ]
Post subject:  Re: Tunnel/Tree-Stand Project

Wow what a great project!! I love the windows!!

Author:  healey36 [ Wed Feb 21, 2024 4:59 pm ]
Post subject:  Re: Tunnel/Tree-Stand Project

As noted, this project found its genesis/inspiration in the castle-tunnel build. I wanted a way to incorporate a four-foot artificial pre-lit Christmas tree into a putz village on a 40" x 58" table (serves as my desk the other ten months of the year). Disguising the four-legged steel stand had always been problematic, so why not make a stand somewhat putz-style, part of the scenery if you will. Using some model railroad techniques, it seemed relatively straight-forward to build something to serve that purpose, so off we went. One thing to be aware of, however; I tend to be a stream-of-consciousness style designer/builder, and there's a cost to that. I'll try to note my design/construction gaffes along the way.

The castle was built with a straight tunnel, but I knew that wouldn't work for a tree stand for a couple of reasons, the main one being the tree bit had to be dead-center in the structure to maximize the support. The best way to do that seemed to be to build the tunnel on a curve rather than straight, putting the tree-stand support just inside the radius of the curve. By doing this, I could keep the dimensions to roughly 20 inches square, which also worked best with the table dimensions I had.

The first step was to build a base. I used similar components as before (1/4-inch plywood for the base, 1x6 pine for the tunnel "portals". The two base pieces I cut to fit a 13-1/2 inch radius, the same as O-27 gauge track (also the radius of the Marklin clockwork track I have). I cut a hole in the center of the inside section of the base, figuring I might need access from the underside at some point. Then I cut the tunnel portals/supports 3-1/2 inches wide (just a quarter inch wider than those I made for the castle project) and 4-1/2 inches tall, slightly arched at the top. This was my first design mistake along the way, as despite having test run a number of cars along the track to check clearances, the tunnel proved too narrow for most of my small locos and cars to pass through without rubbing against the interior walls. When I redo this, the tunnel will be expanded in width and height to assure clear passage.

I used eight wood screws and a bit of Titebond glue to attach the portals to the two base sections. I find Titebond (Original) to be superior to most wood glues both in strength and its initial tackiness. Once that was dry, I used USPS corrugated to form the interior walls. I cut the stuff so that the "grain" of the corrugated ran vertically, notching it so that the walls reached the tops of the portals. This allowed fairly easy bending of the cardboard to form the curved walls of the tunnel. More Titebond and a few pushpins to hold everything in place. When dry, I had this:

Image

The next step was to make the tree-stand support. I cut a bunch of four-inch square pieces and glued them together in a stack. If I'd had a piece of four-by-four, I could have used that, but I didn't and there are plenty of scraps in the workshop. I then glued the stack to the base, adding a couple of woodscrews from the underside. Once that was in place, I cut a top from a scrap of 3/4-inch birch plywood I had, then screwed the top of the block tower and the tunnel portals. Next, I drilled a 1-1/8 inch hole down through the top and into the block tower, about five or six inches deep. I test fit the tree into this hole to make sure (1) it fit at the base and (2) the base provided adequate support against tipping:

Attachment:
File comment: Tree test-fit
Tunnel project d.jpg
Tunnel project d.jpg [ 303.43 KiB | Viewed 1231 times ]


Satisfied that it would be stable, I drilled a second hole down through the top to pass the power cord through, then a notch in the base for the cord to exit (that was my second design blunder...the notch should have been on the back side of the mountain, not the front). I added a contoured support to the back side between the top and the base to try to assure that the base remained flat, which it did. Now we had this:

Image

I let the whole thing dry for a couple days, then we were ready for some scenery.

I'm already exhausted :lol:

Author:  healey36 [ Wed Feb 21, 2024 5:38 pm ]
Post subject:  Re: Tunnel/Tree-Stand Project

After a few days "curing", we proceeded to scenery.

Here my methods of constructing scenery are similar to those used by many model railroaders. It's a process of cutting and adding partitions in the profile of the slope, then covering them with either plaster-infused bits of gauze or paper-towel, or the old school process of papier-mâché. Lionel had a method of using glue-soaked felt, but I've tried that a couple of times looking for a "vintage" finish and, let me say, it's a terrible mess. Howard used papier-mâché for his castle and it worked great when I tried it, so I decided we'd do it again. The one problem with using papier-mâché is that it wouldn't be too difficult for someone to poke a hole through it in a moment of over-exuberance. The advantage is it's lightweight, even more so than plaster.

I cut the hillside partitions from more USPS corrugated, the strength of which I can't overstate given how thin it is. It's a simple matter of cutting the pieces to to a uniform height and depth to fit the base, but using some variation in the "topography". You want a bit of irregularity in the hillside, so mix it up. It looks tedious, but it actually goes pretty quick. Now, I wasn't building a mesa, so I also built some pieces along the edge of the top to provide some contour there as well. Lastly, I envisioned adding a couple of small cardboard houses on the inside slope for visual interest, so I notched those partitions to accommodate them. When that was done, we were here:

Image

You could start papering at this point, but I find the partitions can show through the covering a bit too much for my taste. In the old days, I'd add some balled-up paper between the partitions to add some additional contour, but that adds quite a bit of weight if you can't remove the paper afterwards (the case here on the back slope). Instead, I add webbing between the partitions which will help prevent too much sagging. Now this part is tedious, but again, once you get going, it goes pretty quick:

Image

The last step before papering was to add the basic structure of the two small buildings. I used a few scraps of framing matt-board to cut out the pieces, including a few openings for windows and doors. The one I gave a bit of crenulation at the top, perhaps a tribute to the castle project:

Image

Once those were in place, I was ready to paper.

Author:  healey36 [ Wed Feb 21, 2024 5:40 pm ]
Post subject:  Re: Tunnel/Tree-Stand Project

Thanks, Lynn...the castle project was epic.

I want to say I did both of these projects on the kitchen counter and on the old dining room table. The true miracle of this was I remained married throughout.

Author:  healey36 [ Wed Feb 21, 2024 6:15 pm ]
Post subject:  Re: Tunnel/Tree-Stand Project

My papier-mâché methods are pretty straight-forward. It's basically the same one I used fifty years ago in high-school art class, only I've substituted diluted white glue for the old wheat paste we used back in the day. Also, instead of strips of torn newspaper, I used small pieces of torn paper grocery bags. First, I tore up a bzillion two-inch-by-three-inch pieces of paper bag, then I mixed my glue (one part glue to two parts water). It's super important to tear the pieces, don't cut them; you gotta have that nice feathered edge you get when you tear it. The result is a nice soft edge you can blend/mesh together as you layer the covering onto the hillside.

I papered the center section first (the part with the two buildings between the tunnel portals), then the section across the back. Carefully butt the paper around the base, to the portals and building walls, then up and over the top edge bit. I put a little diluted glue on my fingers and went over any rough seams, even applied a few patches to thin spots I noticed. When I was happy that I'd covered everything adequately, I left it to dry overnight. It looked like this as I was finishing the papering process:

Image

When dry, it turns to a lighter color (the paper bag material looks quite dark when wet). If you see any gaps or tears, you can carefully craft a patch and apply it using a bit of paper bag and some glue. There were a few spots I went back and touched up. After that, I let it dry again. The next step is to detail your exterior tunnel portals.

Tunnel portals come in all sorts of forms and materials. Some are stone, some are concrete, some are stucco, some are just holes blasted out of a hillside. I like the finished look of cut stone, so for this I unashamedly stole Howard's technique used on the castle project. I cut a bunch of approximately 1-1/2" x 7/8" pieces of thin corrugated, then folded them in half. I trimmed one end to match the contour of the abutting hillside, then glued them onto the portal in "L" shaped over-the-corner pieces. You want the pieces rough and somewhat irregular in shape, but also in "courses" as best you can (and don't forget the keystone at the top). It's a bit fiddly, but using some imagination, I ended up with this:

Image

Once the portals were detailed and the papering in good shape, we were ready for the fun part - painting.

Author:  healey36 [ Wed Feb 21, 2024 6:39 pm ]
Post subject:  Re: Tunnel/Tree-Stand Project

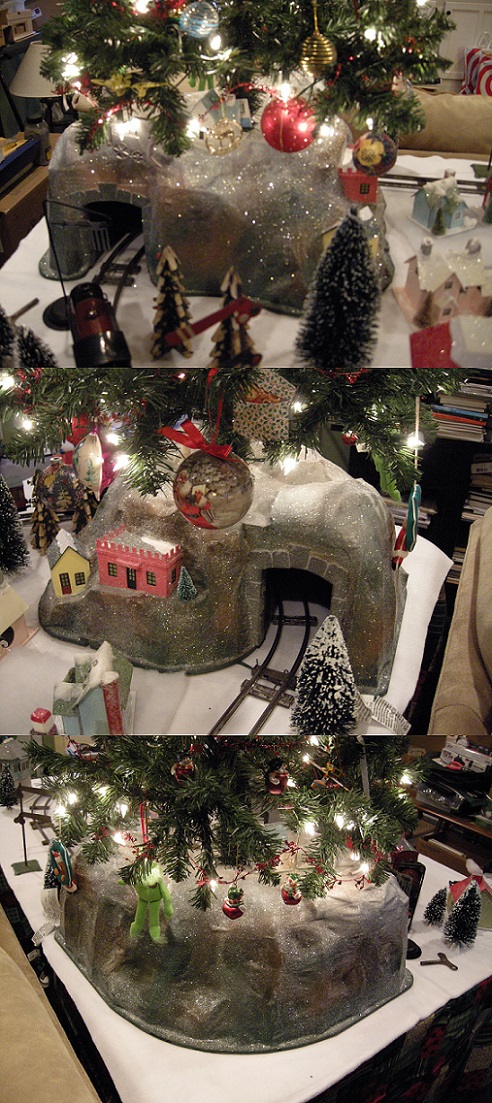
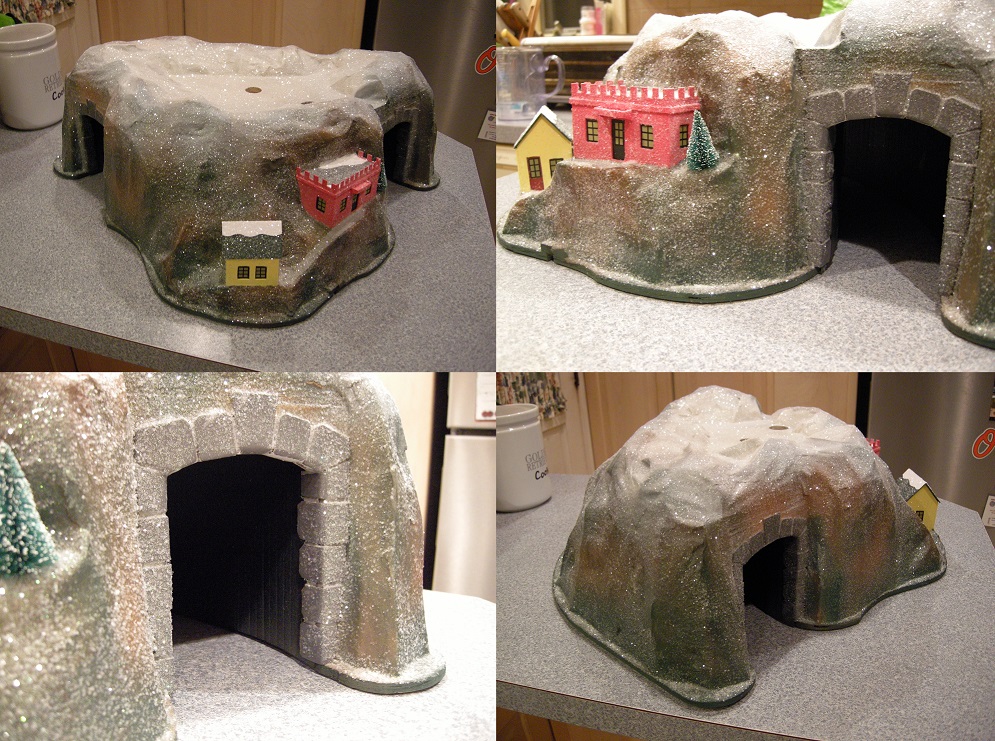
Okay, once absolutely dry, I was ready to paint. Before I go on, I want to mention the beauty of knowing it all gets doused in glitter at the end...glitter goes a very long way towards covering up all of the imperfections of the finish. The painting process would be in two steps: (1) the overall "mountain", and (2) the detailing of the cardboard houses and the tunnel portals.

For the overall mountain, I used a few cans of flat or satin spray paint in green, tan, brown, gray, and white. I started with green around the base, than a mottling of green/brown/tan/gray going up the hillside. The top third of the slope and the entire top I sprayed white, going for a snow-capped mountain effect. There was some overspray on the building walls and tunnel portals, but no worries as I knew I was going to hand-paint anyway. I gave the stone portal masonry a brush with some medium gray acrylic craft paint I "borrowed" from the wife's stash, leaving the joints a lighter color for contrast:

Image

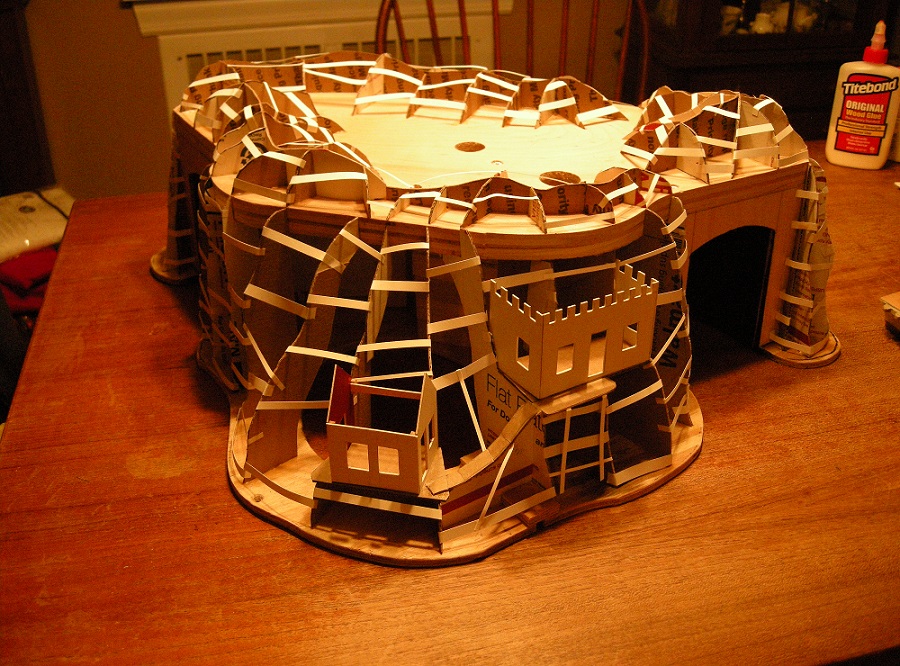
The last thing I had to do in painting was to detail the buildings. They looked a bit drab, if I'm honest, so I tried think of things to dress them up. The one with the crenulated roof line, I added a strip of basswood around the top to look like a cornice or ledge, then a small portico over the front door. I used a few strips to paper the corners so the but-joints wouldn't show. I then gave it a couple coats of salmon-colored craft paint (same source), followed by more paper corners and a couple coats of yellow for the smaller peaked-roof house.

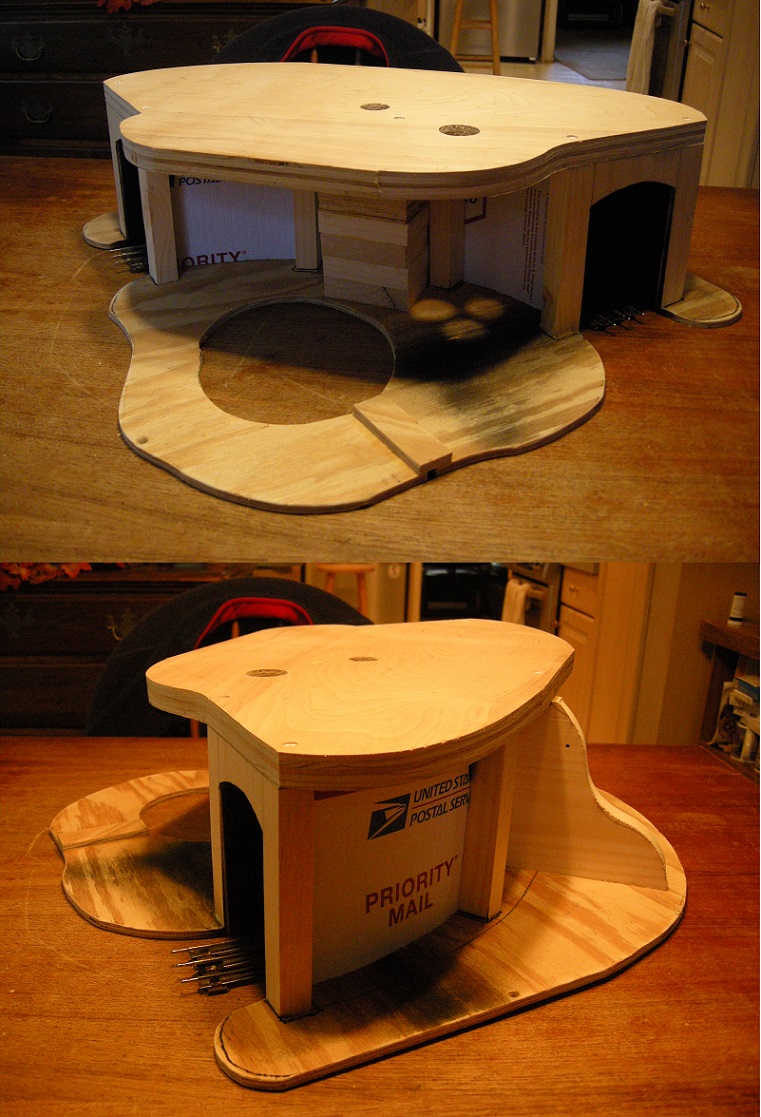
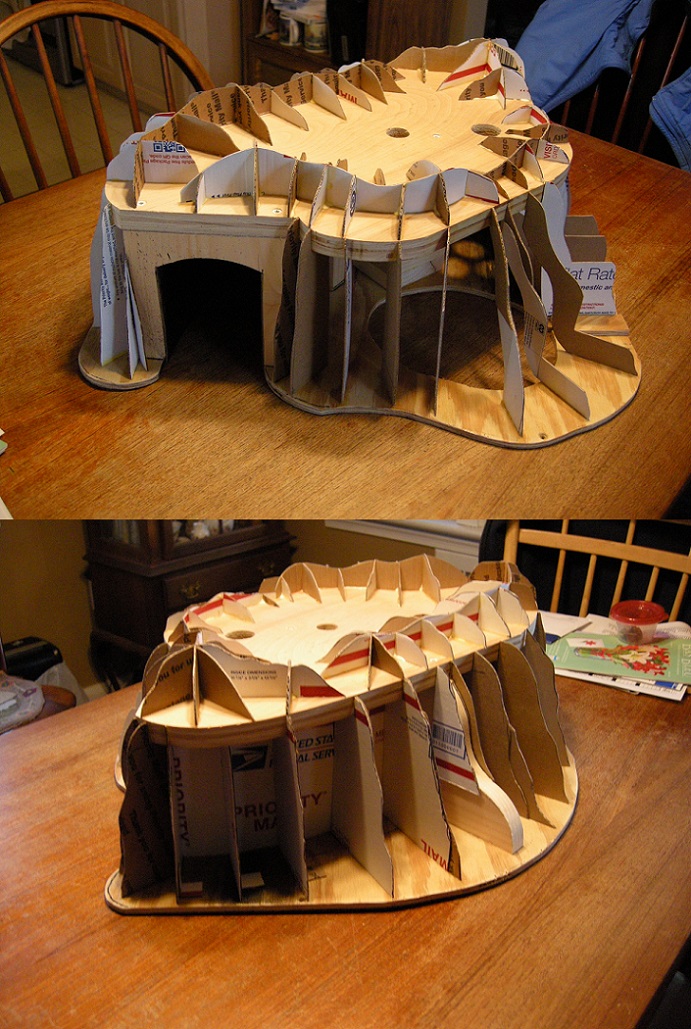
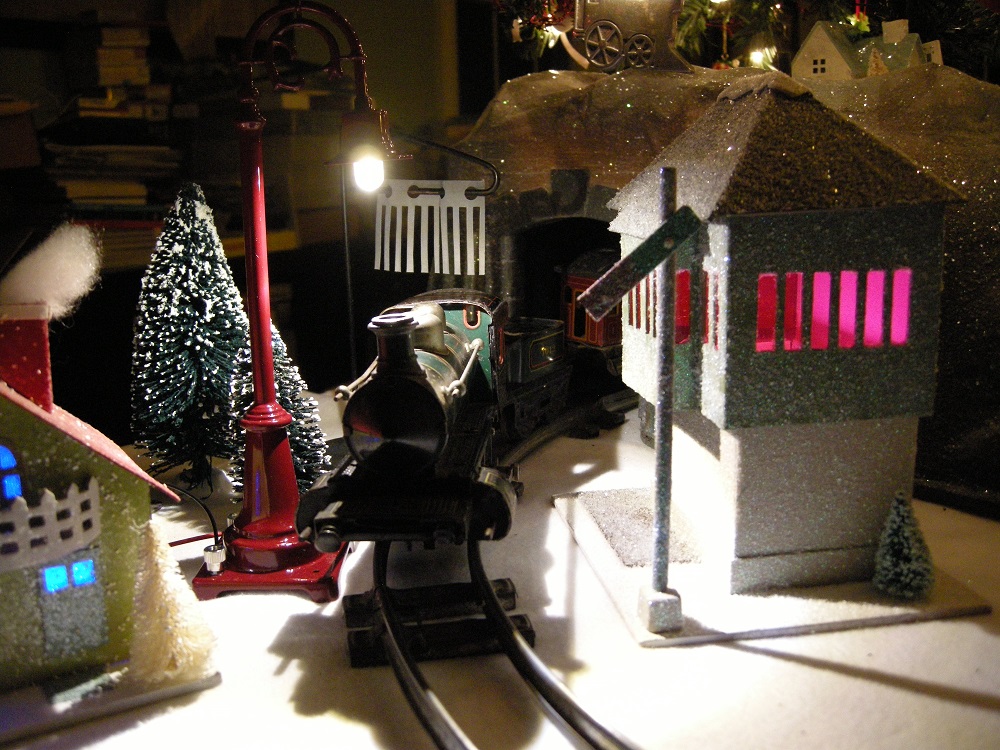
One of the neat things about the the prewar Lionel tunnels was that some included both interior lights and small buildings on the exterior. There was a hole in the felt or the sheet-metal that allowed s a bit of the interior light to shine through, illuminating the windows of the small buildings. It's a neat effect if you're lucky enough to have seen one. I attempted to replicate the effect here by leaving an opening behind each building and putting translucent vellum paper in the windows. The mistake I made was not leaving easy access to the interior for an interior light. A string of mini-lights/LEDs would work, with the battery box on the outside to turn on/off. But I digress.

I've gotten pretty good at using MS Excel to print windows; the problem has been finding a good print medium. I've tried a number of different sheet-plastics and papers for printing, but vellum paper seems to work the best. It's printable, it's translucent, and it's reasonably durable. I printed a couple sets along with doors, cemented them in, than made a roof for each building. Since this is a Christmas themed project, I added some "snow" effects.

The last thing to do was to slather the whole thing with glitter. I have found a nice course, highly-reflective, white glitter seems to work best. I painted the entire tunnel structure with Mod Podge, then sprinkled it liberally with glitter. After a few minutes, I dumped off the excess, then sprinkled it all back on again. This I left to dry for a few hours. Once dry, I dumped off any remaining excess, brushed it lightly to knock off any loose bits, then called it done:

Image

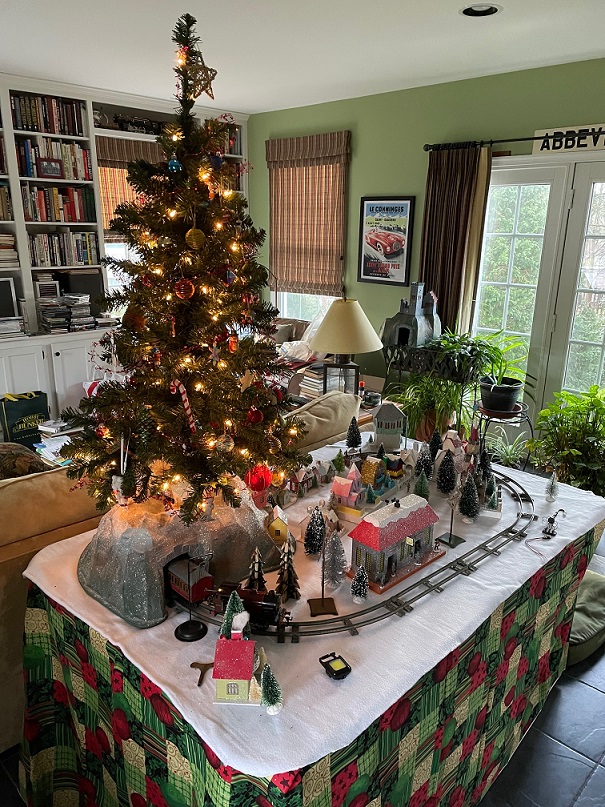
You let that dry for a few days, then it's ready for the display.

Author:  healey36 [ Wed Feb 21, 2024 6:54 pm ]
Post subject:  Re: Tunnel/Tree-Stand Project

Unfortunately, I didn't take too many pics of the project completed, but here's a few:

Image

Image

Image

Image

One thing - I never got around to installing an interior lighting solution, so that's another issue for the redux.

Fun project. Might be awhile before I do it again, though. Oy. :lol:

Author:  Howard [ Thu Feb 22, 2024 11:00 am ]
Post subject:  Re: Tunnel/Tree-Stand Project

healy36...(the other Paul)... :)
You certainly didn't leave anything out in your "how and what with" overview of the tree stand/tunnel project...
Howard...

Author:  healey36 [ Thu Feb 22, 2024 11:59 am ]
Post subject:  Re: Tunnel/Tree-Stand Project

You know me Howard; never write a short story when a novel will do.

Paul

Page 1 of 2 All times are UTC - 5 hours [ DST ]
Powered by phpBB® Forum Software © phpBB Group
http://phpbb.com/